ContactSwift User Guide
Current Version: 1.4
Welcome to the ContactSwift User Guide! ContactSwift is an all-in-one desktop application designed to optimize contact and task management for teams. With its dual-interface approach, users can utilize the speed and precision of a Command Line Interface (CLI) and the visual ease of a Graphical User Interface (GUI). ContactSwift is ideal for small business owners, managers, and team leaders who aim to streamline their remote team’s workflows.
This guide will equip you with everything you need to maximize the benefits of ContactSwift, from initial setup to advanced features.
Product Overview:
ContactSwift offers a robust suite of features to manage employee contacts and task assignments effortlessly:
- Rapid Contact Management: Quickly add, delete, update, and search for contacts using intuitive CLI commands.
- Advanced Task Tracking: Assign tasks to contacts and track their progress to enhance productivity.
- Sophisticated Filtering System: Filter contacts by name, tags, roles, or teams to efficiently organize and retrieve employee information.
- Unique ID System: Each contact in ContactSwift is assigned an unique identifier (UID), ensuring precise and efficient management of contact details. This UID is key to performing actions like editing, deleting, or adding tasks for specific contacts. You will encounter these UIDs as you use various commands, offering a streamlined way to manage large datasets. This system is designed to enhance the user experience, enabling you to easily deal with duplicates!
Who is this guide for? This guide is tailored for small business owners and remote team managers seeking an effective solution to manage contact details and tasks. We assume users have a basic understanding of command-line operations but have structured this guide to be accessible even to those new to CLI environments.
Why this guide? The purpose of this user guide is to facilitate a quick and thorough understanding of ContactSwift, enabling you to maximize the application's features for better management and productivity.
How to Use This Guide
Navigate through this guide using the Table of Contents. Icons and formatting are used throughout to signify different types of information:
- Bold for commands and important terms.
- Italics for notes and additional information.
Codefor actual input commands and any technical references to code, filenames, terminology, etc.
Check the Glossary for explanations of technical terms to ensure a smooth learning experience with ContactSwift.
Table of Contents
- Introduction
- Quick Start
- Features
- Managing Your Employees
- FAQ
- Known Issues
- Command Summary
- Feedback and Support
- Glossary
Quick Start
Embark on your ContactSwift journey with these straightforward steps:
- Installation: Ensure Java
11or above is installed on your computer. Learn how to check your Java version. - Download: Access the latest
contactswift.jarfrom our releases page. - Setup: Select a folder as your home for ContactSwift and move the downloaded file there.
- Launch: Open a command terminal, navigate to your home folder, and initiate the application with
java -jar contactswift.jar. The GUI, populated with sample data, will appear as shown below:
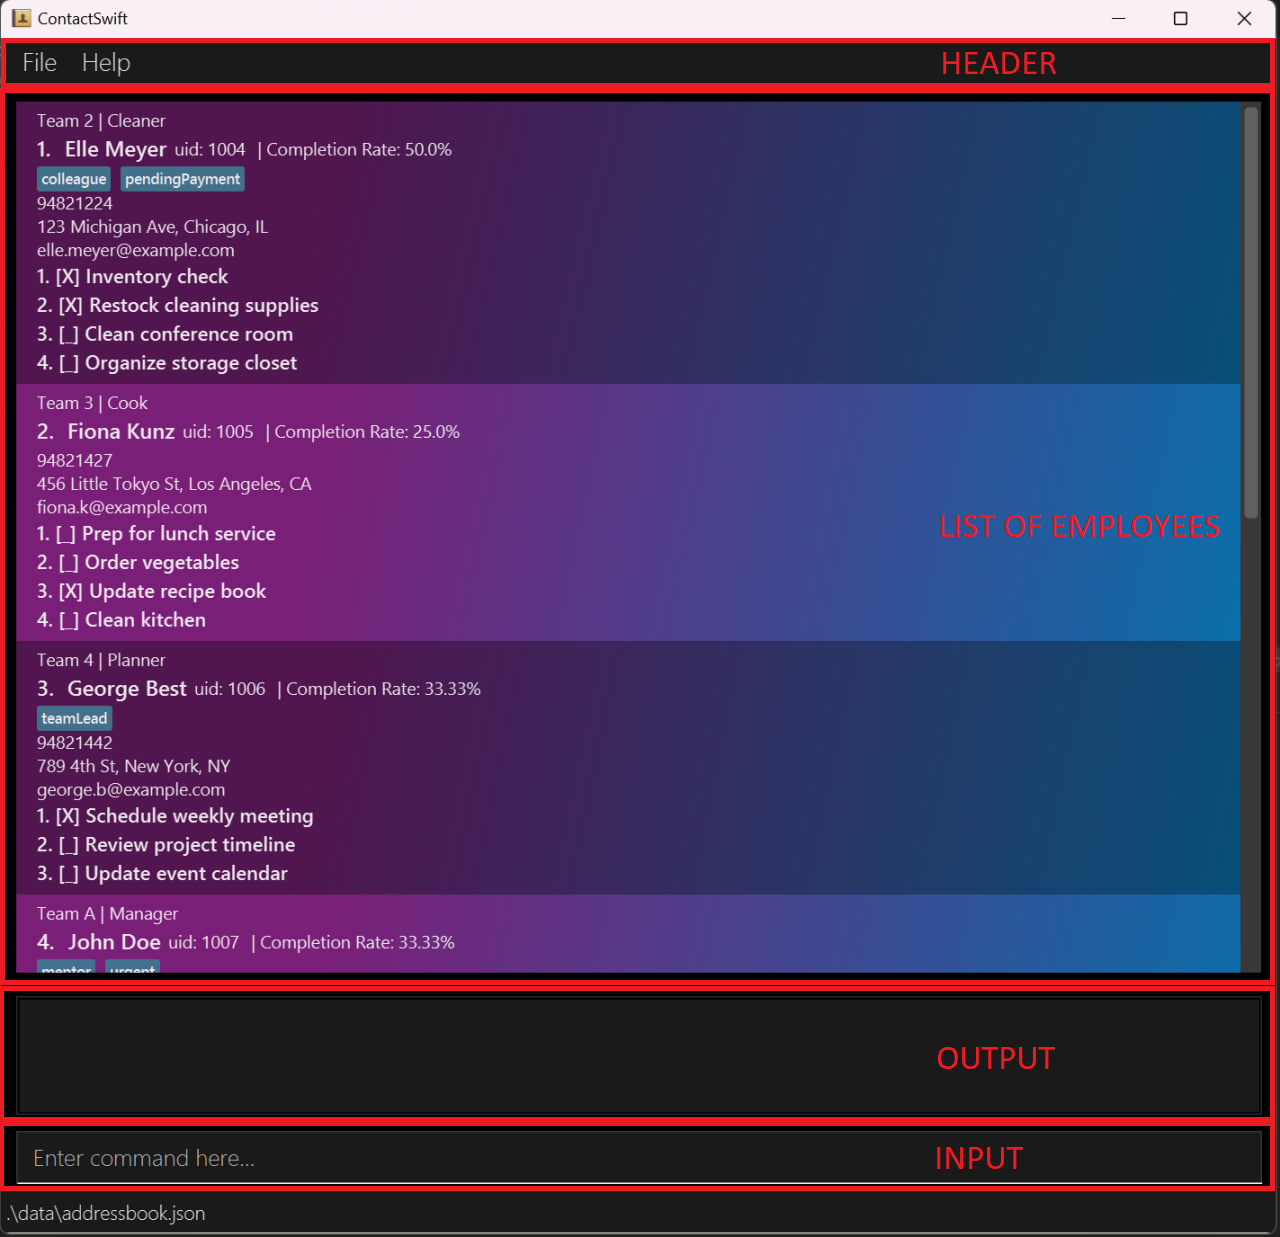
Figure 1: The main interface of ContactSwift, showcasing sample data.
- Get Commanding: Input commands in the command box and press Enter. Try these to get started:
list– Displays all contacts.add n/John Doe p/98765432 e/johnd@example.com a/John street, block 123, #01-01 T/A r/Manager– Adds a new contact.find John– Searches for contacts with the nameJohn.
For a detailed explanation of all commands, refer to the Features section.
Features
Understanding the command format is crucial for using ContactSwift effectively. Here are some tips:
Words in
UPPER_CASEare the parameters to be supplied by the user.
e.g. inadd n/NAME,NAMEis a parameter which can be used asadd n/John Doe.Items in square brackets are optional.
e.g.n/NAME [t/TAG]can be used asn/John Doe t/friendor asn/John Doe.Items with
… after them can be used multiple times including zero times.
e.g.[t/TAG]…can be used as(i.e. 0 times),t/friend,t/friend t/familyetc.Parameters can be in any order.
e.g. if the command specifiesn/NAME p/PHONE_NUMBER,p/PHONE_NUMBER n/NAMEis also acceptable.Extraneous parameters for commands that do not take in parameters (such as
help,list,exitandclear) will be ignored.
e.g. if the command specifieshelp 123, it will be interpreted ashelp.If you are using a PDF version of this document, be careful when copying and pasting commands that span multiple lines as space characters surrounding line-breaks may be omitted when copied over to the application.
Viewing help : help
Shows a message explaining how to access the help page.

Figure 2: The help command output in ContactSwift
Format: help
Listing all employees : list
Shows a list of all employees in the address book.
Format: list
Adding an employee: add
Adds an employee to the address book.
Format: add n/NAME p/PHONE_NUMBER e/EMAIL a/ADDRESS r/ROLE T/TEAM [t/TAG]…
Tip: An employee can have any number of tags (including 0)
Examples:
add n/John Doe p/98765432 e/johnd@example.com a/John street, block 123, #01-01 T/A r/Manageradd n/Betsy Crowe t/friend e/betsycrowe@example.com a/Newgate Appartment p/1234567 T/B r/Secretary
Caution:
- Phone Number: Ensure the
PHONE_NUMBERis valid; ContactSwift does not accept phone numbers with fewer than 3 digits. Do not make thePHONE_NUMBERmore than 15 digits to maintain uniformity and ensure all numbers are fully visible in the user interface. - Name Length: Keep names reasonably short to ensure full visibility in the user interface.
- Email Length: Use concise email addresses to prevent them from extending beyond the UI's visible space.
- Address Length: Opt for shorter addresses to enhance visibility and readability in the interface.
- Role and Team Names: Keep role and team names succinct to avoid truncation in the display.
- Tag Descriptions: Limit tag descriptions to ensure they are brief and avoid cluttering the UI.
- Number of Tags: While multiple tags are supported, adding too many can obscure visibility, making it difficult to see all tags in the user interface.
Locating employees by name: find
Finds employees whose names contain any of the given keywords.
Format: find KEYWORD [MORE_KEYWORDS]
- The order of the keywords does not matter. e.g.
Hans Bowill matchBo Hans - Only the name is searched.
- Persons matching at least one keyword will be returned (i.e.
ORsearch). e.g.Hans Bowill returnHans Gruber,Bo Yang
Examples:
find JohnreturnsjohnandJohn Doefind alice davidreturnsAlice Smith,David Williams
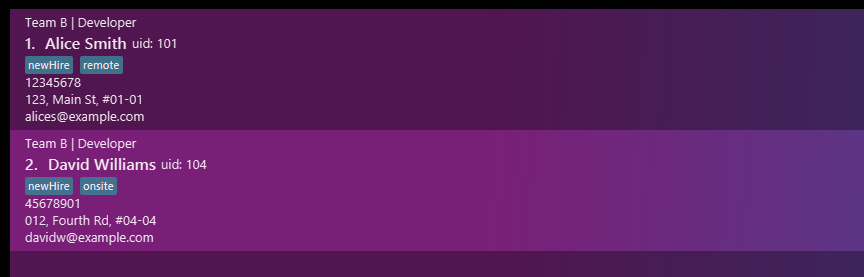
Figure 3: The result for
find alice davidFilter employees by name, tags, roles, or teams: filter
The filter command is used to search for employees based on specific attributes such as their name, tags, role, or team. This powerful tool allows you to narrow down the list of employees to those who meet certain criteria, making it easier to manage and interact with your employees.
Format: filter [n/NAME] [t/TAG] [r/ROLE] [T/TEAM]
Important: While each parameter (NAME, TAG, ROLE, TEAM) is individually optional and enclosed in brackets [ ] indicating optional input, you must provide at least one of these parameters for the command to function.
Note: If no parameters are provided, the command will fail to execute, showing the message: "No valid fields present for filter command".
This command filters the list of employees based on their name, tags, role, or team.
- Filters the employee list according to the specified criteria.
- Employees matching all provided criteria will be listed (i.e.,
ANDsearch). - Only single values are allowed for the name, role, and team parameters. Tags can accept multiple values, each preceded by
t/. - When filtering by team, prepend "Team " to the team name (e.g.,
T/Team HR) to ensure accurate filtering. - Name and team fields are case-insensitive, meaning they do not require an exact match of case to filter correctly. For instance,
T/Team HRis equivalent toT/team hr. - Role and tag fields are case-sensitive, meaning they require an exact match of case to filter correctly. For instance,
r/Managerwill not matchr/manager. - Name must be an exact match, however it is case-insensitive. For instance,
n/johnwill not matchJohn Doe. It must be the full namen/john doe. - The order of the parameters does not matter. e.g.
filter n/John Doe t/friendwill produce the same output asfilter t/friend n/John Doe.
Examples:
filter t/friend t/Colleague: Shows all employees tagged asfriendandColleague, respecting case for tags.filter n/john doe: Shows employees namedJohn Doe, regardless of the case used in the filter.filter r/Executive T/TEAM SALES: Shows employees with the roleExecutive(exact case match required) and in the 'Sales' team, regardless of how the team name's case is entered.filter t/colleague T/TEAM 2 r/Cleanershould produce a similar output as below:
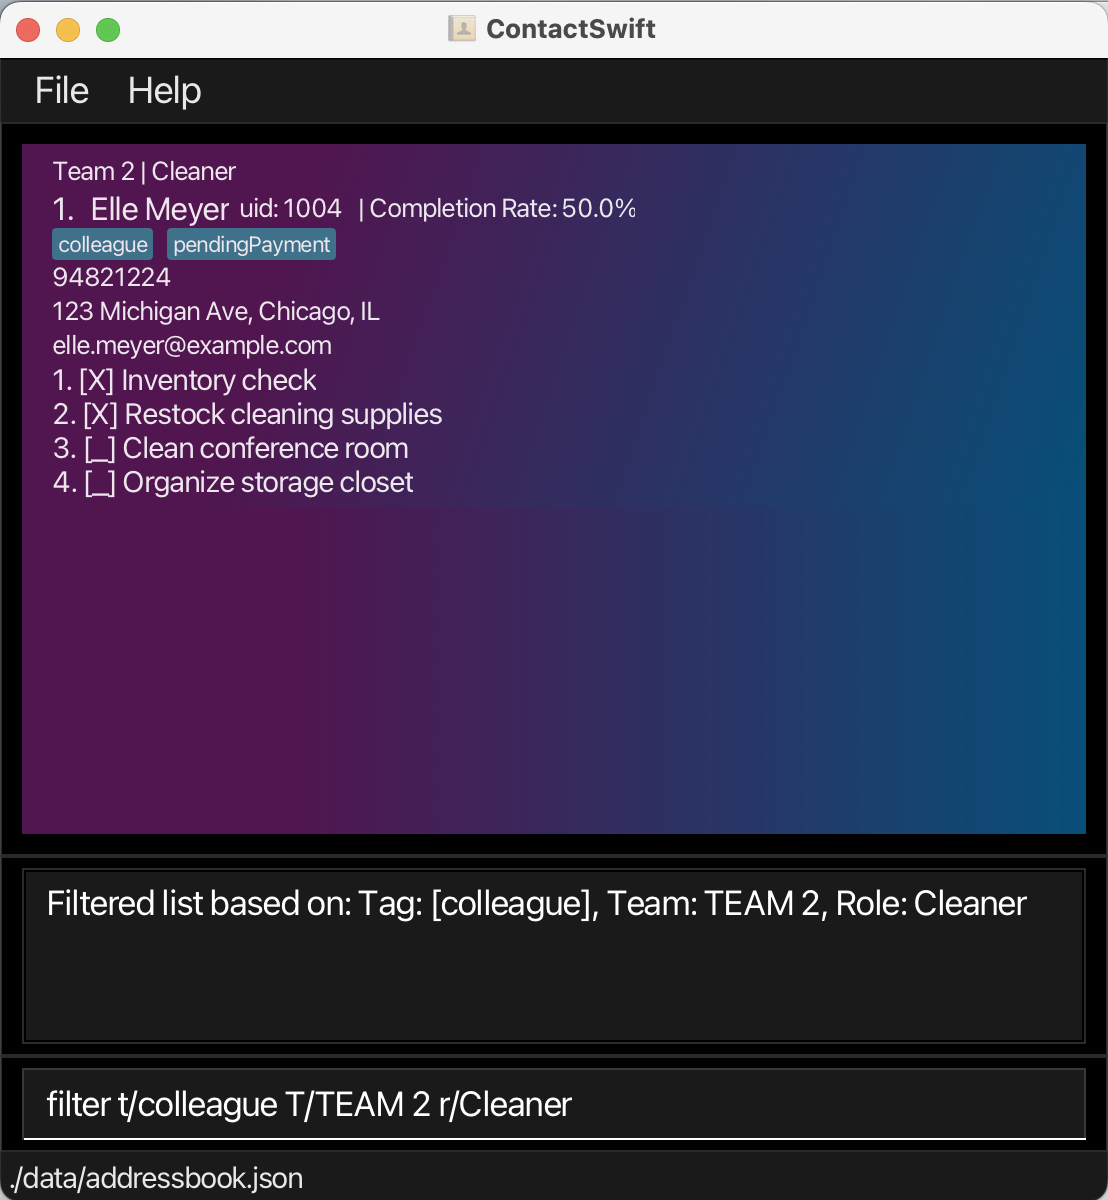
Figure 4: The result for
filter t/colleague T/TEAM 2 r/CleanerEditing an employee : edit
Edits an existing employee in the address book.
Format: edit INDEX [n/NAME] [p/PHONE] [e/EMAIL] [a/ADDRESS] [T/TEAM] [r/ROLE] [t/TAG]…
- Edits the employee at the specified
INDEX. The index refers to the index number shown in the displayed employee list. The index must be a positive integer 1, 2, 3, … - At least one of the optional fields must be provided.
- Existing values will be updated to the input values.
- When editing tags, the existing tags of the employee will be removed i.e. adding of tags is not cumulative.
- You can remove all the employee’s tags by typing
t/without specifying any tags after it.
Examples:
edit 1 p/91234567 e/johndoe@example.comEdits the phone number and email address of the 1st employee to be91234567andjohndoe@example.comrespectively.edit 2 n/Betsy Crower t/Edits the name of the 2nd employee to beBetsy Crowerand clears all existing tags.
Deleting an employee : delete
Deletes the specified employee from the address book.
Format: delete INDEX or delete uid/UID or delete NAME
- Deletes the employee at the specified
INDEX/UID/NAME. - The
NAMEshould not include numbers. - The index refers to the index number shown in the displayed employee list.
- The index must be a positive integer 1, 2, 3, … and must be within the range of the displayed list.
- The UID refers to the user ID displayed beside the employee's name.
- The name must be an exact match, however it is case-insensitive.
Caution: Deleting an employee is irreversible. Ensure you have typed the correct INDEX, UID, or NAME before proceeding.
Examples:
listfollowed bydelete 2deletes the 2nd employee in the address book.delete betsydeletes the employee with the namebetsyif there are no duplicates. In the case of duplicates, the user will be prompted to delete by uid.delete uid/101deletes the employee with theuidof 101.
Important Note Before Using Task-Related Commands
Before using any task-related commands (addTask, mark, unmark, deleteTask), you must first find the employee using the find command. This ensures that the employee's information is correctly loaded and visible in the UI (User Interface), and any subsequent commands will reflect their effects immediately in the UI.
Example of using the find command:
find John Doewill search and display the tasks and details of 'John Doe' in the UI.
Caution: Due to a current bug, if you do not use the find command to locate and display the employee's details before executing other commands, the changes may not immediately reflect in the UI.
Add a task to an employee task list: addTask
Adds a task to an employee's task list.
Reminder: Use the find command to ensure the employee's details are displayed in the UI before adding a task.
Format: addTask uid/UID DESCRIPTION
- Adds a task to the employee with the specified
UID. - The
UIDrefers to the user ID displayed beside the employee's name. - The description of the task must be provided.
- The description of the task can only contain alphanumeric characters and spaces, and cannot be empty.
Examples:
addTask uid/1 Complete the report by 5pmaddTask uid/2 Submit the proposal by 10am
Caution:
- UID Validity: Ensure the UID corresponds to an existing employee. Invalid UIDs will result in an error.
- Task Description Length: Keep the task description concise. Excessively long descriptions may not be fully visible in the user interface and can complicate task management.
- Character Restrictions: The description should only include alphanumeric characters and spaces. Special characters are not supported and may lead to unexpected errors.
Mark a task as completed: mark
Marks a task as completed in the employee's task list.
Reminder: Use the find command to ensure the employee's details are displayed in the UI before marking a task as completed.
Format: mark uid/UID TASKINDEX
- Marks the task at the specified
TASKINDEXas completed for the employee with the specifieduid. - The
UIDrefers to the user ID displayed beside the employee's name. - The
TASKINDEXrefers to the index number shown in the displayed task list. - The
TASKINDEXmust be a positive integer 1, 2, 3, … and must exist as displayed in the UI.
Caution: This command can mark a task that is already marked as completed. Use this feature carefully to avoid misrepresenting the completion status of tasks.
Examples:
mark uid/1 2marks the 2nd task in the task list of the employee with theUIDof 1 as completed.mark uid/2 1marks the 1st task in the task list of the employee with theUIDof 2 as completed.
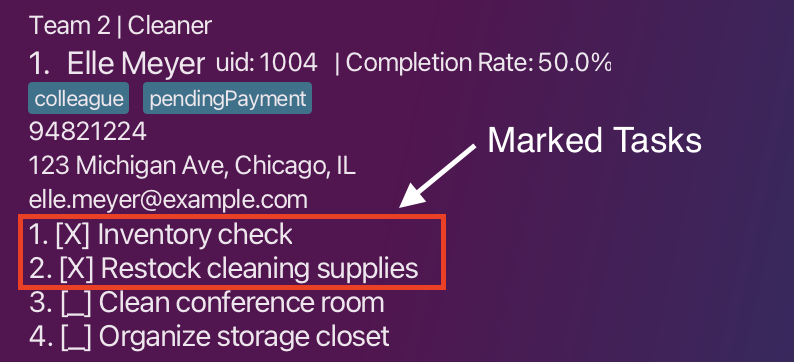
Figure 5: Example of marking a task as completed in the UI
Unmark a task as completed: unmark
Unmarks a task as completed in the employee's task list.
Reminder: Use the find command to ensure the employee's details are displayed in the UI before unmarking a task.
Format: unmark uid/UID TASKINDEX
- Unmarks the task at the specified
TASKINDEXas not completed for the employee with the specifieduid. - The
UIDrefers to the user ID displayed beside the employee's name. - The
TASKINDEXrefers to the index number shown in the displayed task list. - The
TASKINDEXmust be a positive integer 1, 2, 3, … and must exist as displayed in the UI.
Caution: This command can unmark a task that is not marked as completed. Be cautious to ensure accurate tracking of task completion status.
Examples:
unmark uid/1 2marks the 2nd task in the task list of the employee with theUIDof 1 as not completed.unmark uid/2 1marks the 1st task in the task list of the employee with theUIDof 2 as not completed.
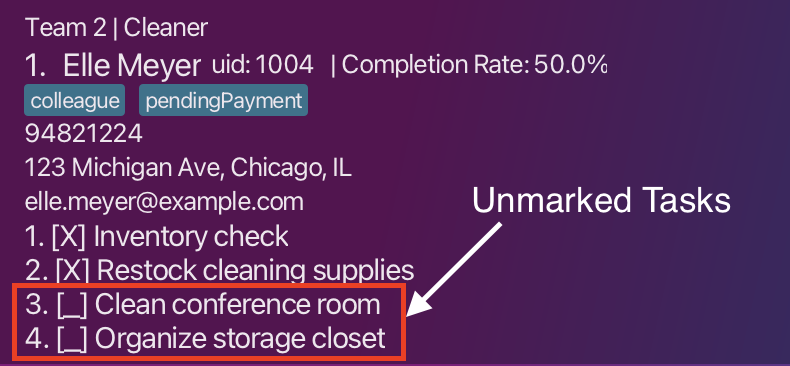
Figure 6: Example of unmarking a task as completed in the UI
Delete a task from an employee task list: deleteTask
Deletes a task from an employee's task list.
Reminder: Use the find command followed by the list command to ensure the employee's details and tasks are displayed in the UI before deleting a task.
Format: deleteTask uid/UID TASKINDEX
- Deletes the task at the specified
TASKINDEXfrom the task list of the employee with the specifieduid. - The
UIDrefers to the user ID displayed beside the employee's name. - The
TASKINDEXrefers to the index number shown in the displayed task list. - The
TASKINDEXmust be a positive integer 1, 2, 3, … and must exist as displayed in the UI.
Examples:
deleteTask uid/1 2deletes the 2nd task in the task list of the employee with theUIDof 1.deleteTask uid/2 1deletes the 1st task in the task list of the employee with theUIDof 2.
Clearing all entries : clear
Clears all entries from the address book.
Format: clear
Exiting the program : exit
Exits the program.
Format: exit
Saving the Data
ContactSwift data are saved on the hard disk automatically after any command that changes the data. There is no need to save manually.
Note: While ContactSwift attempts to save automatically, it's good practice to regularly back up your data file, especially before making bulk changes or updates.
Caution:
- Data Format Validity: If your changes to the data file make its format invalid, ContactSwift will discard all data and start with an empty data file or template data at the next run. We recommend taking a backup of the file before editing it.
- Unexpected Behavior: Certain edits can cause ContactSwift to behave in unexpected ways, such as if a value entered is outside the acceptable range. Edit the data file only if you are confident that you can update it correctly.
- UID Size: If you choose to edit the JSON file directly, ensure not to assign excessively large UIDs. Overly large UIDs may not be handled properly by the system and could lead to performance issues or errors.
Archiving data files
[coming in v2.0] Sneak Peak:
Introduction to Data Archiving
In version 2.0 of ContactSwift, we introduce a robust data archiving feature designed to enhance data management by allowing you to securely store and back up important contact and task information. This feature is crucial for maintaining a clean and organized database, especially as your dataset grows over time.
Why Archive Data?
Archiving data helps in reducing the load on the main database, improving performance, and securing a historical record of your data that can be accessed or retrieved if necessary. It is particularly useful for maintaining compliance with data retention policies and for organizational audits.
How would it work?
You would be able to archive data with a few simple commands:
archive all- Archives all data in the current database.archive uid/UID- Archives data for a specific contact with the given UID.restore all- Restores all archived data to the main database. This data would be separated in a different tab in the UI (User Interface).restore uid/UID- Restores the archived data for a specific contact with the given UID.restore date/DD-MM-YYYY- Restores all data archived on a specific date.restore /before DD-MM-YYYY- Restores all data archived before a specific date.restore /after DD-MM-YYYY- Restores all data archived after a specific date.
Furthermore, the archived data would be stored in a separate file, ensuring that your main database remains uncluttered and optimized for daily use.
And you would be able to access the archived data at any time in the UI (User Interface), providing a comprehensive view of your historical records.
Best Practices for Archiving
- Regular Archiving: Set a schedule for regular archiving to avoid data clutter.
- Verify Data Integrity: Always check the integrity of the data both pre and post-archiving.
- Secure Storage: Ensure that your archived data is stored in a secure, encrypted format to prevent unauthorized access.
Stay tuned for the release of ContactSwift v2.0 to experience the benefits of data archiving firsthand!
Managing your employees
Great! You have successfully installed ContactSwift and are ready to manage your employees. Let's use all the awesome features that ContactSwift has to offer.
Track your team's productivity!
We are thrilled to introduce a sophisticated enhancement to our application - the Completion Rate Statistics. This innovative feature is designed to provide a comprehensive overview of task management efficiency within your teams, offering a deeper insight into employee productivity.
Understanding the Essence of Completion Rate Statistics
Within the dynamic interface of ContactSwift, each employee now boasts a visible completion rate on their profile card. This rate, a calculated metric representing the proportion of completed tasks to total tasks assigned, serves as an indicator of individual productivity levels. Automatically updated as tasks evolve, this metric ensures that you have the most current view of your team's performance.
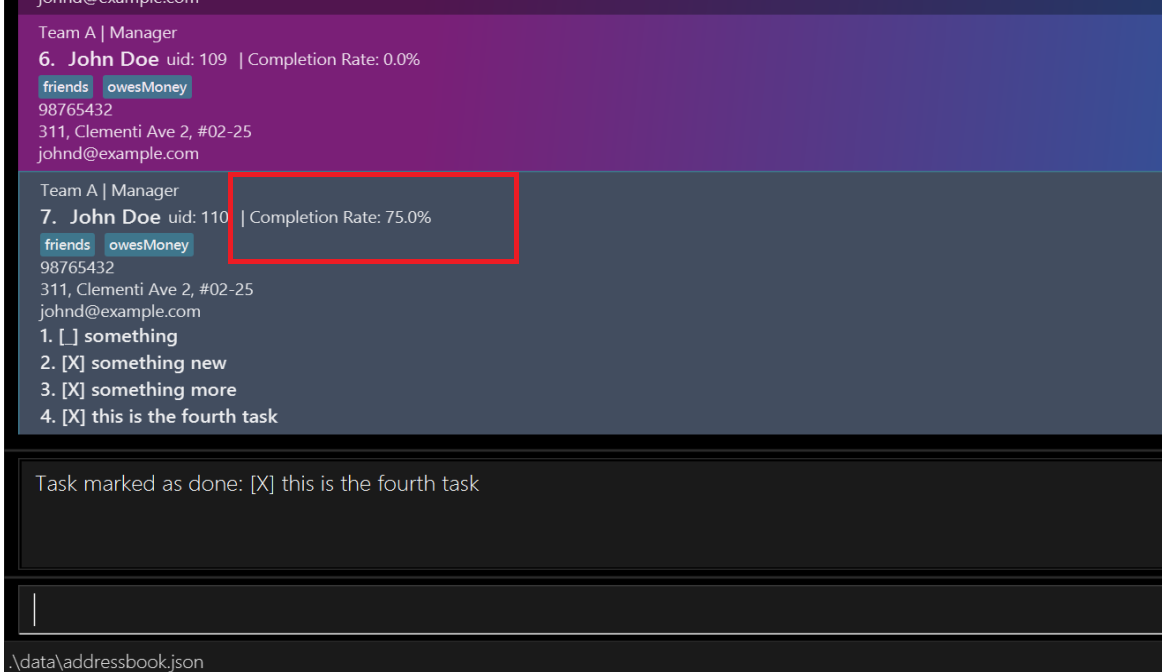
Figure 7: Display of Completion Rate Statistics
How to use it? This feature requires no manual intervention to activate. The completion rate metric operates seamlessly, reflecting real-time updates as tasks are added, completed, or removed. This automatic integration ensures that productivity insights are consistently accurate and available without additional effort from you or your team.
We believe that the Completion Rate Statistics feature will significantly contribute to enhancing the efficiency and productivity of your team, offering a clear, quantifiable measure of task management success. We are confident that this addition will empower you and your team to achieve and surpass your productivity goals.
FAQ
Q1: How do I install Java 11?
A1: Follow the instructions on the Java 11 download page.
Q2: How can I transfer my ContactSwift data to another computer?
A2: Install ContactSwift on the other computer and overwrite the empty data file it creates with the file that contains the data of your previous ContactSwift home folder.
Q3: How do I change the data file that ContactSwift uses?
A3: ContactSwift uses the file data/addressbook.json in the home folder by default. You can modify the data inside that file or replace it with another file of the same name.
Q4: If I modify the data how do I know it won't run into errors?
A4: ContactSwift can run into unexpected errors if the data file is modified incorrectly. It is recommended to back up the data file before making any changes. However, the command line will log an error message if the data file is corrupted and provide feedback on what went wrong. Depending on the error, the software may start with an empty data file or a template file.
Q5: What happens if I run commands with corrupted data ?
A5: ContactSwift will overwrite the corrupted data file with a new one and start with an empty address book.
Q6: How can I print the contact details or task list?
A6: Currently, ContactSwift does not support direct printing. However, you can the JSON file to some other format (like CSV) and print it.
Q7: What are the limits on the number of contacts or tasks I can add?
A7: ContactSwift does not have a hard limit on the number of contacts or tasks you can add. However, the performance may degrade with a large number of contacts or tasks. For all practical purposes however the application should be able to handle a few thousand contacts and tasks.
Q9: Can I customize the fields for each contact or task in ContactSwift?
A9: ContactSwift does not support custom fields for contacts or tasks. However, you can use the tags field to add additional information.
Q10: How do I report a bug or issue with ContactSwift?
A10: Please refer to the Feedback and Support section for information on how to report bugs or issues.
Q11: How do I request a new feature for ContactSwift?
A11: Please refer to the Feedback and Support section for information on how to request new features.
Known issues
- When using multiple screens, if you move the application to a secondary screen, and later switch to using only the primary screen, the GUI will open off-screen. The remedy is to delete the
preferences.jsonfile created by the application before running the application again.
Command summary
| Action | Format, Examples |
|---|---|
| Add | add n/NAME p/PHONE_NUMBER e/EMAIL a/ADDRESS T/TEAM r/ROLE [t/TAG]… e.g., add n/James Ho p/22224444 e/jamesho@example.com a/123, Clementi Rd, 1234665 T/A r/Cleaner t/friend t/colleague |
| Add Task | addTask uid/UID DESCRIPTION e.g., addTask uid/1 Complete the report by 5pm, addTask uid/2 Submit the proposal by 10am |
| Clear | clear |
| Delete | delete INDEX/delete uid/UID/delete NAMEe.g., delete 3, delete uid/101, delete John Doe |
| Delete Task | deleteTask uid/UID TASKINDEX e.g., deleteTask uid/1 3 |
| Edit | edit INDEX [n/NAME] [p/PHONE_NUMBER] [e/EMAIL] [a/ADDRESS] [T/TEAM] [r/ROLE] [t/TAG]…e.g., edit 2 n/James Lee e/jameslee@example.com |
| Exit | exit |
| Filter | filter [n/NAME] [t/TAG] [r/ROLE] [T/TEAM] e.g., filter t/friend,filter r/Manager T/Team HR, filter T/Team HR t/friend r/Executive |
| Find | find KEYWORD [MORE_KEYWORDS]e.g., find James Jake |
| List | list |
| Help | help |
| Mark Task | mark uid/UID TASKINDEX e.g., mark uid/1 3 |
| Unmark Task | unmark uid/UID TASKINDEX e.g., unmark uid/1 2 |
Feedback and Support
Feedback is a crucial component of continuous improvement for ContactSwift. We actively encourage users, developers, and stakeholders to provide feedback to help us enhance both the functionality of ContactSwift and the usefulness of this Developer Guide.
Here are the ways you can contribute feedback and suggestions:
How to Provide Feedback
Issue Tracker
For technical issues, bugs, or feature requests, please use our official Issue Tracker. This allows us to categorize and prioritize issues effectively. When submitting an issue, please include as much detail as possible, such as the steps to reproduce the issue, expected versus actual behavior, and environment details (OS, ContactSwift version, etc.).
If you have suggestions for improving the Developer Guide or need to discuss matters that require discretion, we'll be providing our email soon here. We appreciate detailed feedback that includes specific sections or topics and any recommendations for improvement.
Surveys and Feedback Forms
Periodically, we may circulate surveys or feedback forms to gather comprehensive opinions on specific aspects of ContactSwift or the Developer Guide. These are excellent opportunities to influence the future direction of the software and documentation.
Feedback Etiquette
Constructiveness: We highly value constructive feedback that provides actionable insights and suggestions for improvement.
Respect and Courtesy: Engage respectfully and professionally with community members and maintain a supportive environment.
Confidentiality: Avoid sharing sensitive or confidential information in public forums or issue trackers.
What Happens to Your Feedback
Review Process: All feedback is reviewed by the development team. We prioritize actions based on the impact, feasibility, and alignment with our development roadmap.
Implementation: If your feedback leads to a change or improvement, we will acknowledge contributions in upcoming release notes or directly within the revised sections of the guide.
Response: While we aim to respond to all feedback, the volume of input may affect our ability to reply individually. However, we value every piece of feedback and strive to incorporate it as best as we can.
Your insights and contributions are invaluable to us and help ensure that ContactSwift continues to evolve in ways that meet and exceed user needs and expectations. Thank you for helping us improve and for being an active member of our community.
Glossary
Alphanumeric characters
Any combination of the alphabets A-Z and numbers 0-9.
CLI (Command Line Interface)
A type of user interface that allows users to interact with a computer program or operating system by typing commands into a console or terminal. CLI is known for its efficiency in performing tasks, enabling users to execute complex commands through concise textual input.
GUI (Graphical User Interface)
A user interface that allows users to interact with electronic devices through graphical icons and visual indicators, as opposed to text-based interfaces, typed command labels, or text navigation. GUIs are typically considered user-friendly, especially for navigating complex software or managing multiple tasks simultaneously, as they provide a visual representation of the system’s operations.
UI (User Interface)
The space where interactions between humans and the system occur. This includes any part of the system, like screens or pages, where users can view or interact with tasks, contacts, or other information. It is designed to be intuitive and user-friendly to facilitate efficient task management and navigation.
Unique Identifier (UID)
UID is a unique identifier assigned to each contact in ContactSwift, enabling precise and efficient management of contact details. Such identifiers serve to differentiate contacts and facilitate actions like editing, deleting, or adding tasks for specific contacts. UIDs are essential for managing large datasets and ensuring accurate contact management.
Completition Rate Statistics
A metric that represents the proportion of completed tasks to total tasks assigned to an employee. This metric is calculated automatically and displayed in the UI, providing a clear indicator of individual productivity levels and task management efficiency.