ContactSwift Developer Guide
Table of Contents
- Acknowledgements
- Setting up, getting started
- Design
- Implementation
- Add Command Implementation
- Unique Identifier (UID) Implementation
- Delete by Name Command Implementation
- Delete by UID Command Implementation
- Filter Command Implementation
- TaskList Feature
- Add Task Feature Implementation
- Delete Task Feature Implementation
- Mark Task Feature Implementation
- Unmark Task Feature Implementation
- Proposed
- Documentation, logging, testing, configuration, dev-ops
- Planned Enhancements
- Feedback
- Appendix: Requirements
- Appendix: Effort
- Appendix: Instructions for manual testing
- Appendix: Glossary
Acknowledgements
We acknowledge the assistance of GitHub Copilot in the development of ContactSwift. This AI programming assistant provided code suggestions and snippets that expedited our development process sometimes. It's important to clarify, though, that the fundamental ideas and high-level concepts of this project are entirely our own creation. Very often, we had to modify or rewrite or fix the code generated by Copilot to ensure it meets our project's requirements and standards.
Additionally, we introduced a basic tasklist feature for each employee, a concept inspired by innovations in the industry, yet developed entirely with original code by our team to ensure it uniquely meets our product's standards and requirements.
Setting up, getting started
Refer to the guide Setting up and getting started.
Design
Architecture
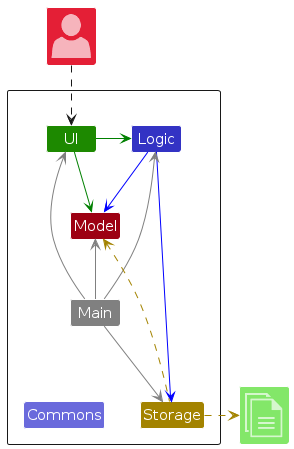
The Architecture Diagram given above explains the high-level design of the App.
Given below is a quick overview of main components and how they interact with each other.
Main components of the architecture
Main (consisting of classes Main and MainApp) is in charge of the app launch and shut down.
- At app launch, it initializes the other components in the correct sequence, and connects them up with each other.
- At shut down, it shuts down the other components and invokes cleanup methods where necessary.
The bulk of the app's work is done by the following four components:
UI: The UI of the App.Logic: The command executor.Model: Holds the data of the App in memory.Storage: Reads data from, and writes data to, the hard disk.
Commons represents a collection of classes used by multiple other components.
How the architecture components interact with each other
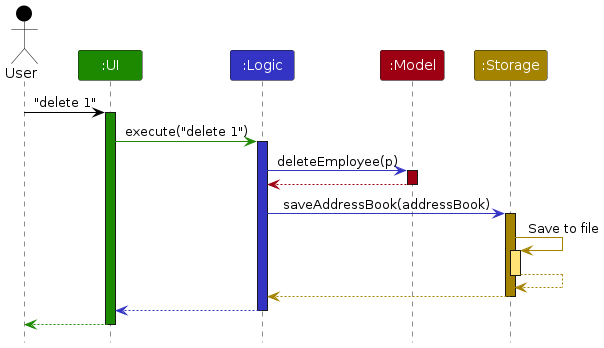
The Sequence Diagram below shows how the components interact with each other for the scenario where the user issues the command delete 1.
Each of the four main components (also shown in the diagram above),
- defines its API in an
interfacewith the same name as the Component. - implements its functionality using a concrete
{Component Name}Managerclass (which follows the corresponding APIinterfacementioned in the previous point.
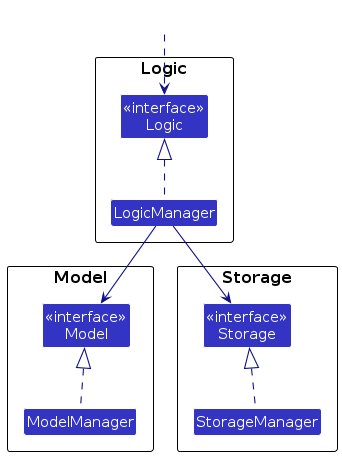
For example, the Logic component defines its API in the Logic.java interface and implements its functionality using the LogicManager.java class which follows the Logic interface. Other components interact with a given component through its interface rather than the concrete class (reason: to prevent outside component's being coupled to the implementation of a component), as illustrated in the (partial) class diagram below.
The sections below give more details of each component.
UI component
The API of this component is specified in Ui.java
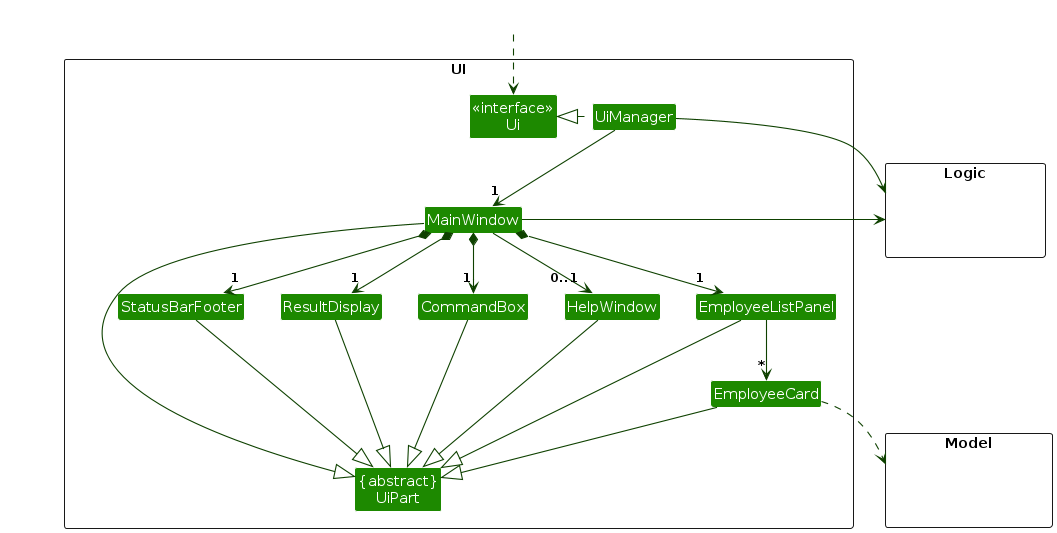
The UI consists of a MainWindow that is made up of parts e.g.CommandBox, ResultDisplay, EmployeeListPanel, StatusBarFooter etc. All these, including the MainWindow, inherit from the abstract UiPart class which captures the commonalities between classes that represent parts of the visible GUI.
The UI component uses the JavaFx UI framework. The layout of these UI parts are defined in matching .fxml files that are in the src/main/resources/view folder. For example, the layout of the MainWindow is specified in MainWindow.fxml
The UI component,
- executes user commands using the
Logiccomponent. - listens for changes to
Modeldata so that the UI can be updated with the modified data. - keeps a reference to the
Logiccomponent, because theUIrelies on theLogicto execute commands. - depends on some classes in the
Modelcomponent, as it displaysEmployeeobject residing in theModel.
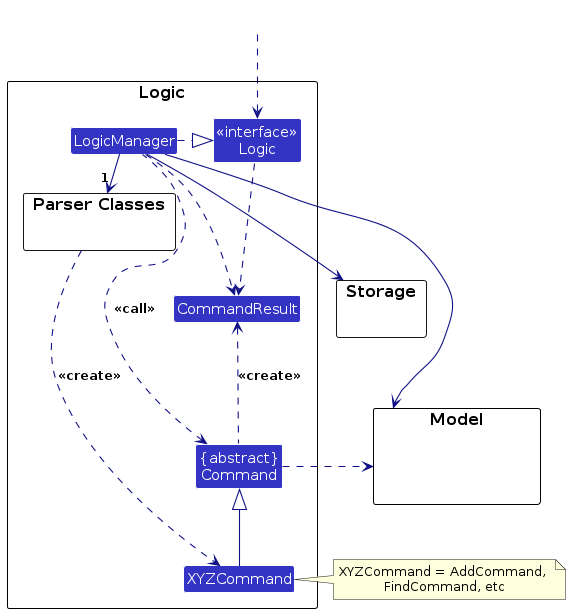
Logic component
API : Logic.java
Here's a (partial) class diagram of the Logic component:
The sequence diagram below illustrates the interactions within the Logic component, taking execute("delete 1") API call as an example.
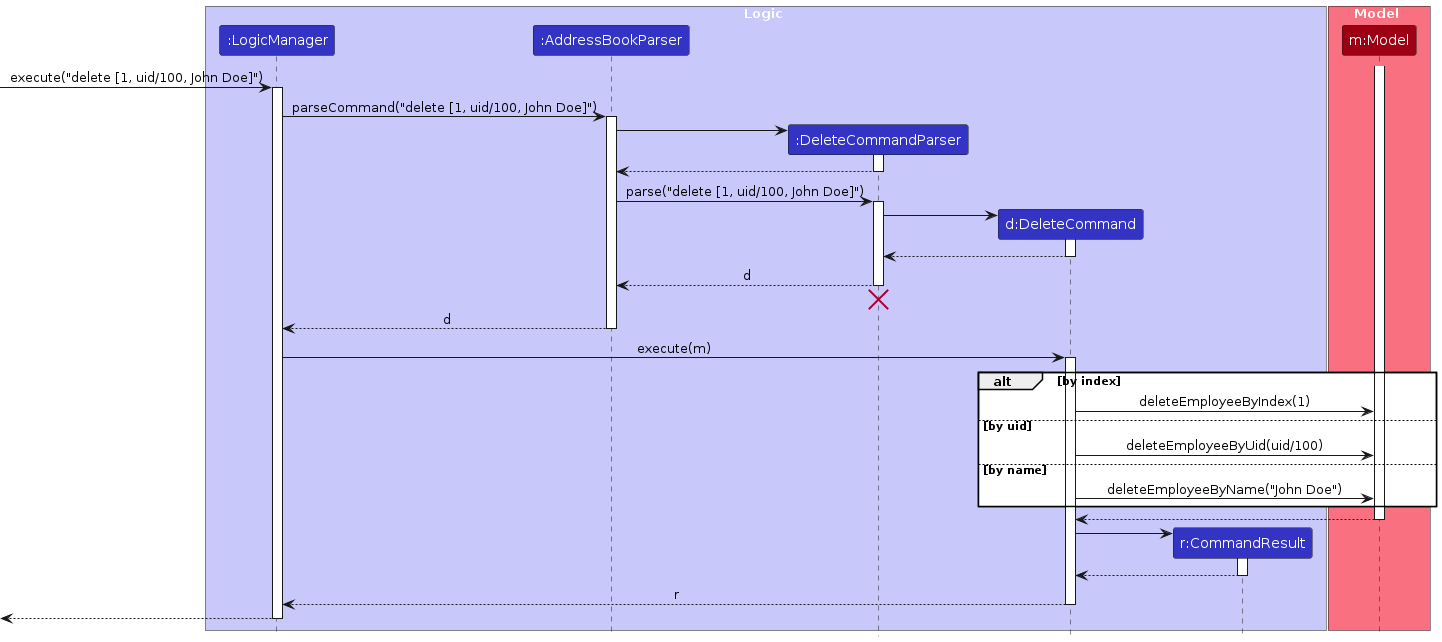
Note: The lifeline for DeleteCommandParser should end at the destroy marker (X) but due to a limitation of PlantUML, the lifeline continues till the end of diagram.
How the Logic component works:
- When
Logicis called upon to execute a command, it is passed to anAddressBookParserobject which in turn creates a parser that matches the command (e.g.,DeleteCommandParser) and uses it to parse the command. - This results in a
Commandobject (more precisely, an object of one of its subclasses e.g.,DeleteCommand) which is executed by theLogicManager. - The command can communicate with the
Modelwhen it is executed (e.g. to delete a employee).
Note that although this is shown as a single step in the diagram above (for simplicity), in the code it can take several interactions (between the command object and theModel) to achieve. - The result of the command execution is encapsulated as a
CommandResultobject which is returned back fromLogic.
Here are the other classes in Logic (omitted from the class diagram above) that are used for parsing a user command:
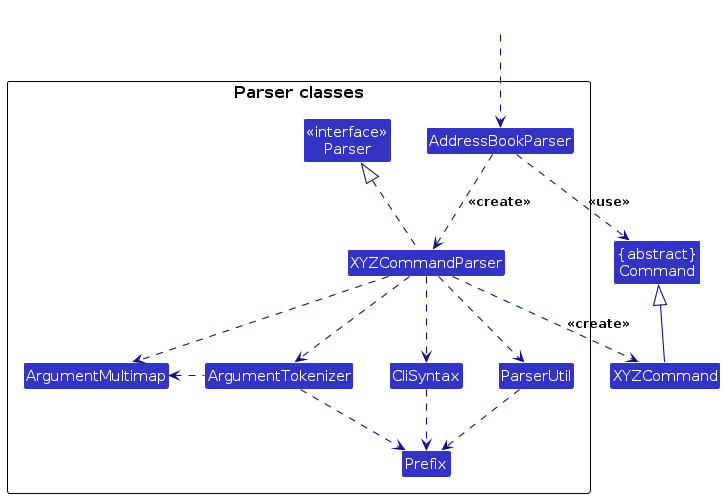
How the parsing works:
- When called upon to parse a user command, the
AddressBookParserclass creates anXYZCommandParser(XYZis a placeholder for the specific command name e.g.,AddCommandParser) which uses the other classes shown above to parse the user command and create aXYZCommandobject (e.g.,AddCommand) which theAddressBookParserreturns back as aCommandobject. - All
XYZCommandParserclasses (e.g.,AddCommandParser,DeleteCommandParser, ...) inherit from theParserinterface so that they can be treated similarly where possible e.g, during testing.
Model component
API : Model.java
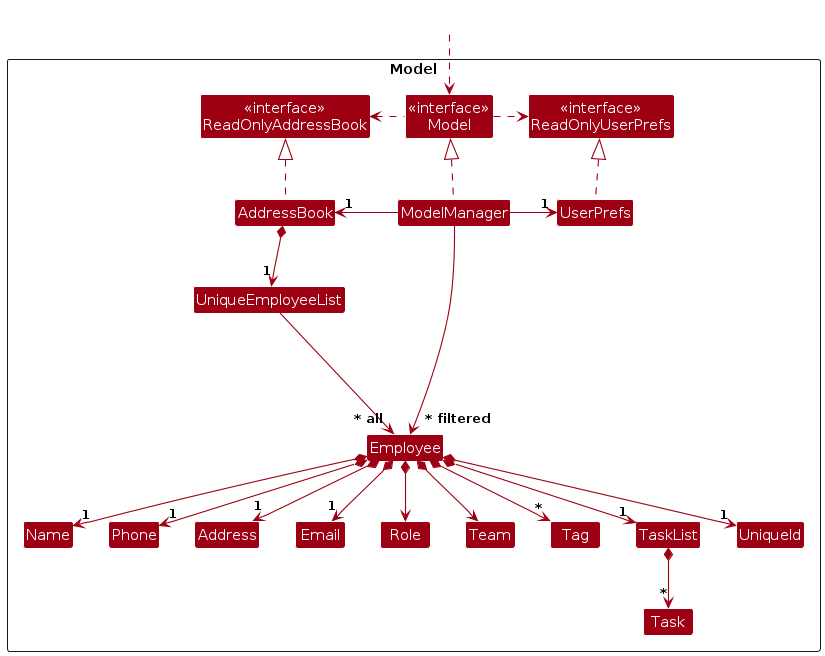
The Model component,
- stores the address book data i.e., all
Employeeobjects (which are contained in aUniqueEmployeeListobject). - stores the currently 'selected'
Employeeobjects (e.g., results of a search query) as a separate filtered list which is exposed to outsiders as an unmodifiableObservableList<Employee>that can be 'observed' e.g. the UI can be bound to this list so that the UI automatically updates when the data in the list change. - stores a
UserPrefobject that represents the user’s preferences. This is exposed to the outside as aReadOnlyUserPrefobjects. - does not depend on any of the other three components (as the
Modelrepresents data entities of the domain, they should make sense on their own without depending on other components)
Note: An alternative (arguably, a more OOP) model is given below. It has a Tag list in the AddressBook, which Employee references. This allows AddressBook to only require one Tag object per unique tag, instead of each Employee needing their own Tag objects.

Storage component
API : Storage.java
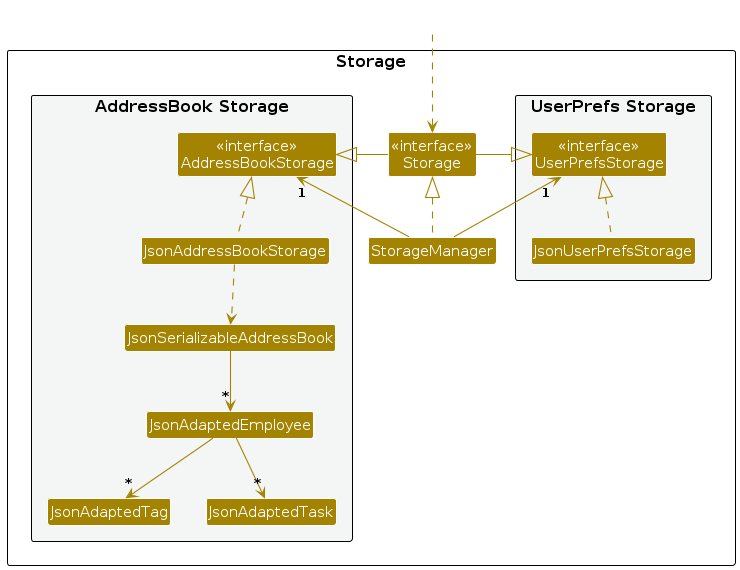
The Storage component,
- can save both address book data and user preference data in JSON format, and read them back into corresponding objects.
- inherits from both
AddressBookStorageandUserPrefStorage, which means it can be treated as either one (if only the functionality of only one is needed). - depends on some classes in the
Modelcomponent (because theStoragecomponent's job is to save/retrieve objects that belong to theModel)
Common classes
Classes used by multiple components are in the seedu.addressbook.commons package.
Implementation
This section describes some noteworthy details on how certain features are implemented.
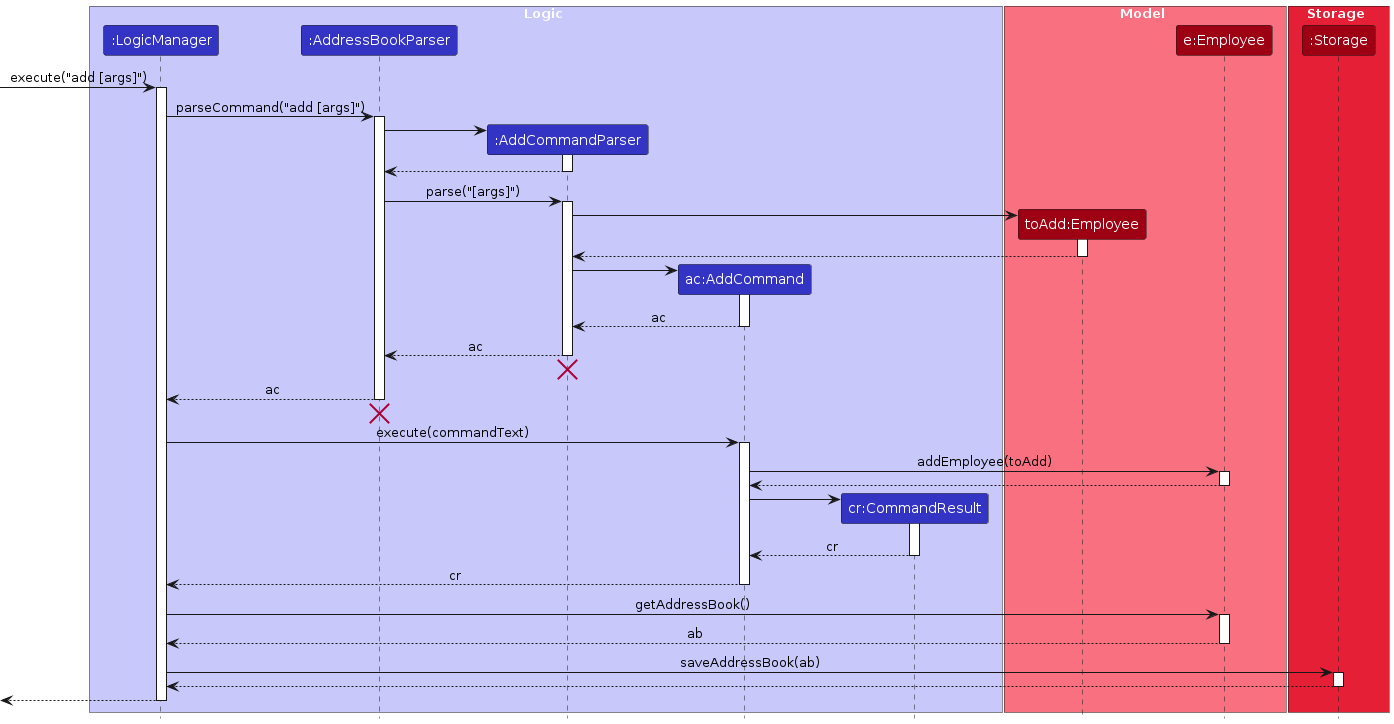
Add Command Implementation
The AddCommand implements the abstract class Command to add a new Employee to the Model.
Given below is how the AddCommand operates:
Step 1. After the user inputs all the prefixes necessary, which are Name, Phone, Address, Email, Team, Role, and optionally Tag, the AddCommandParser parses the input and creates a new Employee for the AddCommand.
Step 2. The AddCommand will then store the added Employee and feed it to the execute method.
Step 3. The execute method then gives the Employee parameter to the addEmployee method under the Model interface.
Step 4. The addEmployee adds the Employee to the Model.
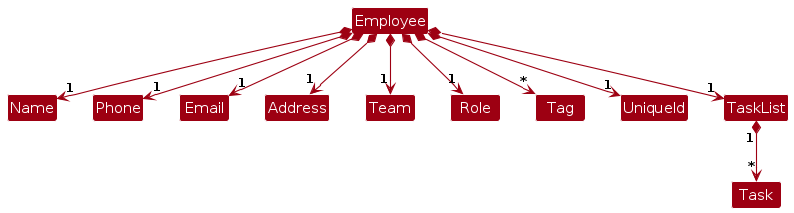
The following class diagram shows the structure of an Employee:
And this is the sequence diagram that describes the steps:
Design considerations:
- Alternative:
TeamandRolecould have been further abstracted into a Class calledHeaderas they appear above the names of theEmployeein the GUI. This was considered so that we could filter the contact list to employees who are in the same team or role. However, it is rejected as filter will be able to be implemented in a simpler manner when avoiding this over-abstraction.
Unique Identifier (UID) Implementation
The introduction of Unique Identifiers (UID) marks a significant enhancement in managing employee records, ensuring the uniqueness of each entry and preventing duplicates. This section elaborates on the UID system's integration into the application, focusing on the deletion process and the assignment of teams and roles.
UID Assignment: Every employee added to the contact book is automatically assigned a unique identifier (UID). This UID serves as a definitive reference to each employee, distinguishing between individuals even if other attributes (such as name, email, and contact number) are identical. The UID is generated sequentially, starting from
DEFAULT_BASE_UIDfor the first employee and incrementing by one for each subsequent addition. This systematic approach ensures that each employee is uniquely identified within the system. To work with exisiting data, UID is set to the last UID in the data, which is also the maximum UID. Furthermore, the UID is displayed alongside the employee's details in the contact list, providing users with a clear and unambiguous reference point for each entry.Enhanced Duplicate Detection: The system leverages UIDs to identify and prevent duplicate entries. Upon adding a new employee, the application checks for duplicates based on a combination of name, email, and contact number. If a potential duplicate is detected, the system relies on the UID to ascertain uniqueness, thereby maintaining the integrity of the employee database.
Loading Data: When loading data, the only catch is if the data has been tampered with and the UIDs have duplicates. In this case, the application will throw an error and refuse to load the data. Instead, the data loaded would be the template data. In future iterations, the application could be enhanced to handle such cases by reassigning UIDs to the data.
Implications
One of the major ways the UID system enhances the application is by streamlining the deletion process. When a user initiates the deletion of an employee, the system prompts the user to specify the deletion target using the employee's UID. This approach eliminates ambiguity and ensures that the correct employee is removed from the database, even in cases where multiple employees share the same name, email, or contact number.
Design Considerations
Why this design: Integrating UIDs enhances the robustness and reliability of the employee management system. It addresses the challenge of duplicate entries and streamlines the process of deleting, team assignment, and role designation, ensuring accuracy and precision in employee record management. In the future, the UID system can be further extended to support additional functionalities such as search, filtering, and sorting, providing users with a more robust and efficient employee management experience.
Alternatives considered: While alternatives such as relying solely on name, email, or contact number for identification were considered, these methods were prone to ambiguity and errors, especially in large datasets. The UID approach was selected for its ability to uniquely identify each employee, thereby enhancing the system's overall functionality and user experience.
Delete by Name Command Implementation
The DeleteCommand was further enhanced to allow users to remove employees from the list by their full name. This functionality is crucial for users who need to manage their employee datasets. The command has been enhanced to handle deletion by name in case of duplicate names.
DeleteCommandParserparses the user input and creates aDeleteCommandobject with a specific target name that encapsulates the deletion logic.Model#deleteEmployee(Employee target)is then called to remove the employee from the list according to the given criteria.- In the scenario where multiple employees have the same name, the user is prompted to delete by uid to ensure the correct employee is removed.
Given below is an example usage scenario and how the delete by name mechanism behaves at each step.
Step 1. The user executes delete John Doe, intending to remove the employee named John Doe. The input is parsed by DeleteCommandParser, which creates a DeleteCommand with the target name.
Step 2. The DeleteCommand is executed, calling Model#deleteEmployee(target), where target is the employee with the name "John Doe". If there are multiple employees with the name "John Doe", a CommandException is thrown asking the user to delete by uid.
Design Considerations
- Why this design: The command pattern is used for consistency with other commands in the application and to keep the parsing and execution logic separated. The use of target name for deletion allows for precise and flexible removal of employees without hard-coding specific deletion types.
- Alternatives considered: A direct approach where the
DeleteCommanddirectly manipulates the employee list was considered but rejected to maintain a clean separation between the command and the model, adhering to the Single Responsibility Principle.
Delete by UID Command Implementation
The DeleteCommand is also implemented to allow users to remove employees from the list by their unique id. This functionality is crucial for users who need to manage their employee datasets, especially when there are multiple employees with the same name.
DeleteCommandParserparses the user input and creates aDeleteCommandobject with a specific target uid that encapsulates the deletion logic.Model#deleteEmployee(Employee target)is then called to remove the employee from the list according to the given criteria.
Given below is an example usage scenario and how the delete by uid mechanism behaves at each step.
Step 1. The user executes delete uid/1234, intending to remove the employee with uid 1234. The input is parsed by DeleteCommandParser, which creates a DeleteCommand with the target uid.
Step 2. The DeleteCommand is executed, calling Model#deleteEmployee(target), where target is the employee with the uid 1234.
Design Considerations
- Why this design: The command pattern is used for consistency with other commands in the application and to keep the parsing and execution logic separated. The use of target uid for deletion allows for precise and flexible removal of employees without hard-coding specific deletion types.
- Alternatives considered: A direct approach where the
DeleteCommanddirectly manipulates the employee list was considered but rejected to maintain a clean separation between the command and the model, adhering to the Single Responsibility Principle.
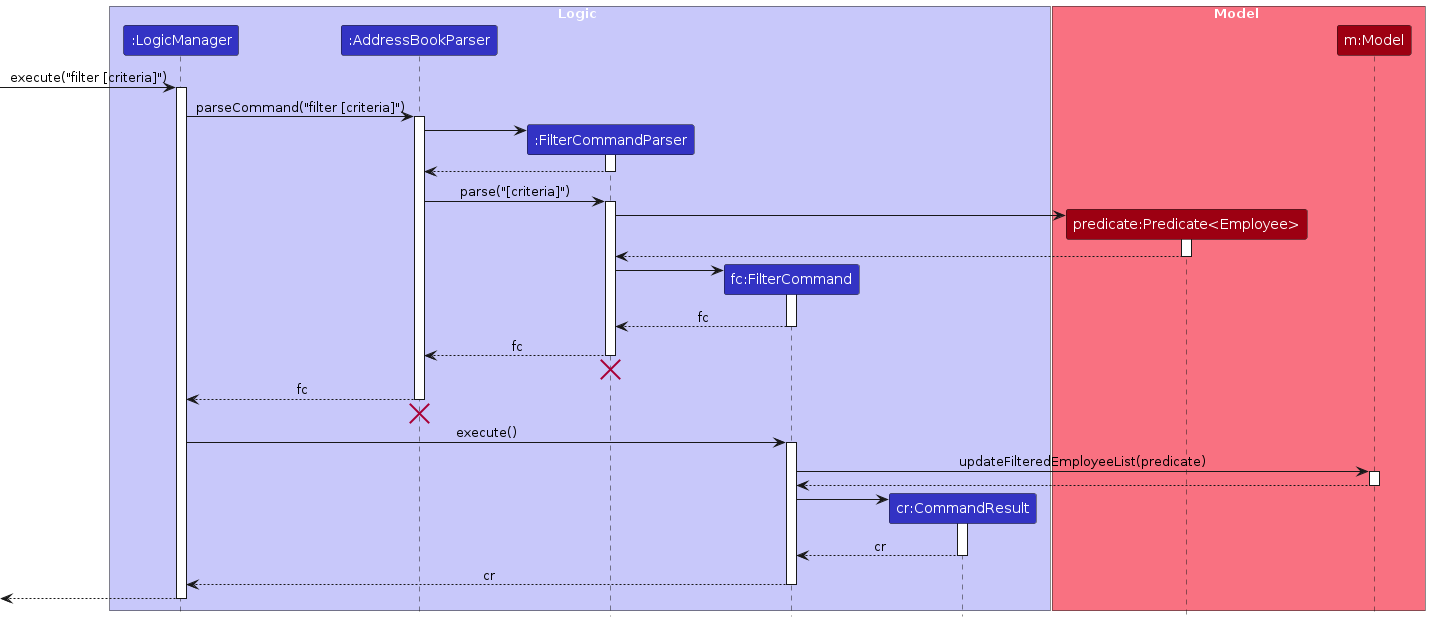
Filter Command Implementation
The FilterCommand implements the Command interface to filter and display subsets of employees based on specified criteria such as name, role, team, and tags. This capability is crucial for managing large datasets of employees and ensuring that subsets of data are readily accessible to users based on their specific needs.
Implementation Details
Given below is how the FilterCommand operates:
Step 1. The user inputs the criteria using prefixes that define the filtering conditions, which are n/Name, r/Role, T/Team, and t/Tag. The FilterCommandParser parses these inputs and constructs a Predicate<Employee> that encapsulates these criteria.
Step 2. The FilterCommand, holding the constructed predicate, is then passed to the execute method.
Step 3. Within the execute method, the FilterCommand invokes the updateFilteredEmployeeList method on the Model, passing the Predicate<Employee>.
Step 4. The Model applies this predicate to filter the list of employees according to the specified criteria, effectively updating the list to show only those employees who meet the conditions.
This is the sequence diagram that describes the steps:
Example Usage Scenario
- User Input: The user types the command
filter t/developer, intending to display employees tagged as developers. - Parsing Command: The
FilterCommandParserinterprets the input and constructs a predicate that matches employees whose tags include "developer". - Executing Command: The
FilterCommandis executed, which invokesModel#updateFilteredEmployeeList(predicate)with the predicate to filter the list. Only employees with the "developer" tag are now shown in the user interface.
Design Considerations
- Command Pattern: We employ the command pattern to maintain consistency with other command implementations in the application. This pattern also helps separate the parsing logic from the execution logic, adhering to the Single Responsibility Principle.
- Use of Predicates: Using predicates for filtering maximizes flexibility and scalability. It allows the filter command to handle various filtering criteria dynamically, without needing to hard-code specific query logic.
- Alternative Approaches: Initially, a direct manipulation approach was considered, where
FilterCommandwould directly modify the employee list. However, this approach was discarded in favor of using the model to handle list manipulations, ensuring that all list state changes remain centralized and manageable through the model, enhancing maintainability and testability.
Filtering Capabilities Explained
- Flexible Criteria: Employees can be filtered by name, tags, role, and team. Each parameter (e.g.,
n/NAME,t/TAG,r/ROLE,T/TEAM) is optional, but at least one must be specified. - Complex Queries: The system supports AND conditions within the same filter type and single conditions for different types. For instance, filtering by
t/friend t/colleaguewill show employees tagged both as "friend" and "colleague". - Case Sensitivity: Role and tag searches are case-sensitive, requiring exact matches, whereas name and team fields are case-insensitive.
TaskList Feature
Implementation
The TaskList feature is facilitated by the TaskList class, located in the src/main/java/seedu/address/model/tasklist directory. It maintains a list of Task objects, each representing a task assigned to an employee.
The Task class, located in the src/main/java/seedu/address/model/task directory, represents a task with a Description and a done status. The Description class encapsulates the details of the task.
The Employee class, located in the src/main/java/seedu/address/model/employee directory, contains a TaskList object. This allows each employee to have their own list of tasks.
Employee#addTask(Description description)— Creates a new task with the given description and adds it to the employee's task list.Employee#getTaskList()— Returns the employee's task list.Employee#getTask(int taskNumber)— Returns the task at the specified index in the employee's task list.
Design Considerations
Aspect: Representation of tasks in the
Employeeclass- Alternative 1 (current choice): Each
Employeeobject has aTaskListobject.- Pros: Allows for encapsulation of task-related behaviors in the
TaskListclass. Simplifies theEmployeeclass. - Cons: Requires additional methods in the
Employeeclass to interact with theTaskList.
- Pros: Allows for encapsulation of task-related behaviors in the
- Alternative 2: Each
Employeeobject has aList<Task>object.- Pros: Simplifies the
Employeeclass as there is no need for task-related methods. - Cons: Does not allow for encapsulation of task-related behaviors. Makes the
Employeeclass more complex.
- Pros: Simplifies the
- Alternative 1 (current choice): Each
Aspect: Storage of tasks
- Alternative 1 (current choice): Tasks are stored as a list in the
TaskListclass.- Pros: Allows for easy addition, removal, and retrieval of tasks. Supports ordering of tasks.
- Cons: Does not support efficient search or lookup of tasks.
- Alternative 2: Tasks are stored as a set in the
TaskListclass.- Pros: Supports efficient search or lookup of tasks.
- Cons: Does not support ordering of tasks. Makes addition, removal, and retrieval of tasks more complex.
- Alternative 1 (current choice): Tasks are stored as a list in the
Add Task Feature Implementation
The AddTask feature is implemented to allow users to add tasks to each employee. This functionality is crucial for users who need to assign tasks to each employee.
AddTaskCommandParserparses the user input and creates anAddTaskCommandobject with the specific task details, namely UniqueId of the Employee, and the Description of the task.Employee#addTask(int employeeId, Description task)is then called to add the task to the specified employee's task list.
Given below is an example usage scenario and how the add task mechanism behaves at each step.
Step 1. The user executes addtask uid/1 Buy milk, intending to add the task "Buy milk" to the first employee in the list. The input is parsed by AddTaskCommandParser, which creates an AddTaskCommand with the employee ID and the task details.
Step 2. The AddTaskCommand is executed, calling Employee#addTask(description), where description is the new description of the new task to be added.
Design Considerations
Why this design: The command pattern is used for consistency with other commands in the application and to keep the parsing and execution logic separated. The use of a separate
TaskListfor each employee allows for flexible and dynamic task management without hard-coding specific task types.Alternatives considered: A direct approach where the
AddTaskCommanddirectly manipulates the employee's task list was considered but rejected to maintain a clean separation between the command and the model, adhering to the Single Responsibility Principle.
Delete Task Feature Implementation
The DeleteTask feature is implemented to allow users to remove tasks from each employee's task list. This functionality is crucial for users who need to manage the tasks assigned to each employee.
DeleteTaskCommandParserparses the user input and creates aDeleteTaskCommandobject with the specific task index and the UniqueId of the Employee.Employee#deleteTask(int taskIndex)is then called to remove the task from the specified employee's task list.
Given below is an example usage scenario and how the delete task mechanism behaves at each step.
Step 1. The user executes deletetask uid/1 1, intending to remove the first task from the first employee in the list. The input is parsed by DeleteTaskCommandParser, which creates a DeleteTaskCommand with the employee ID and the task index.
Step 2. The DeleteTaskCommand is executed, calling Employee#deleteTask(taskIndex), where taskIndex is the index of the task to be removed.
Design Considerations
Why this design: The command pattern is used for consistency with other commands in the application and to keep the parsing and execution logic separated. The use of a separate
TaskListfor each employee allows for flexible and dynamic task management without hard-coding specific task types.Alternatives considered: A direct approach where the
DeleteTaskCommanddirectly manipulates the employee's task list was considered but rejected to maintain a clean separation between the command and the model, adhering to the Single Responsibility Principle.
Mark Task Feature Implementation
The MarkTask feature is implemented to allow users to mark tasks as done for each employee. This functionality is crucial for users who need to track the completion of tasks assigned to each employee.
MarkTaskCommandParserparses the user input and creates aMarkTaskCommandobject with the specific task index and the UniqueId of the Employee.TaskList#markTask(int taskIndex)is then called to mark the task as done in the specified employee's task list.
Given below is an example usage scenario and how the mark task mechanism behaves at each step.
Step 1. The user executes mark uid/1 1, intending to mark the first task of the first employee in the list as done. The input is parsed by MarkTaskCommandParser, which creates a MarkTaskCommand with the employee ID and the task index.
Step 2. The MarkTaskCommand is executed, calling TaskList#markTask(taskIndex), where taskIndex is the index of the task to be marked as done.
Unmark Task Feature Implementation
The UnmarkTask feature is implemented to allow users to unmark tasks as done for each employee. This functionality is crucial for users who need to track the completion of tasks assigned to each employee.
UnmarkTaskCommandParserparses the user input and creates aUnmarkTaskCommandobject with the specific task index and the UniqueId of the Employee.TaskList#unmarkTask(int taskIndex)is then called to unmark the task as done in the specified employee's task list.
Given below is an example usage scenario and how the unmark task mechanism behaves at each step.
Step 1. The user executes unmark uid/1 1, intending to unmark the first task of the first employee in the list as done. The input is parsed by UnmarkTaskCommandParser, which creates a UnmarkTaskCommand with the employee ID and the task index.
Step 2. The UnmarkTaskCommand is executed, calling TaskList#unmarkTask(taskIndex), where taskIndex is the index of the task to be unmarked as done.
Design Considerations
- Why this design: The command pattern is used for consistency with other commands in the application and to keep the parsing and execution logic separated. The use of a separate
TaskListfor each employee allows for flexible and dynamic task management without hard-coding specific task types. - Alternatives considered: A direct approach where the
MarkTaskCommandandUnmarkTaskCommanddirectly manipulate the employee's task list was considered but rejected to maintain a clean separation between the command and the model, adhering to the Single Responsibility Principle.
Proposed
Undo/redo feature
Proposed Implementation
The proposed undo/redo mechanism is facilitated by VersionedAddressBook. It extends AddressBook with an undo/redo history, stored internally as an addressBookStateList and currentStatePointer. Additionally, it implements the following operations:
VersionedAddressBook#commit()— Saves the current address book state in its history.VersionedAddressBook#undo()— Restores the previous address book state from its history.VersionedAddressBook#redo()— Restores a previously undone address book state from its history.
These operations are exposed in the Model interface as Model#commitAddressBook(), Model#undoAddressBook() and Model#redoAddressBook() respectively.
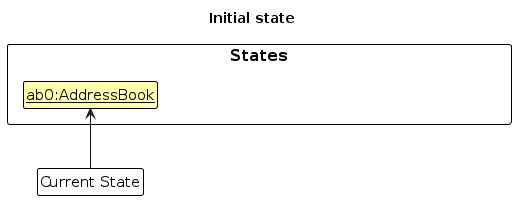
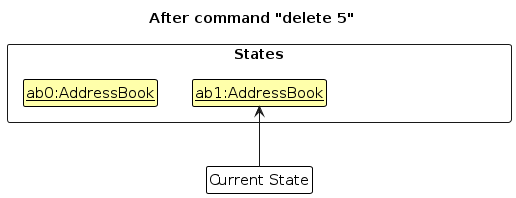
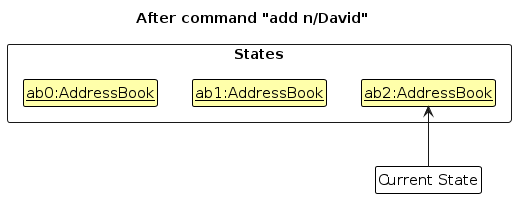
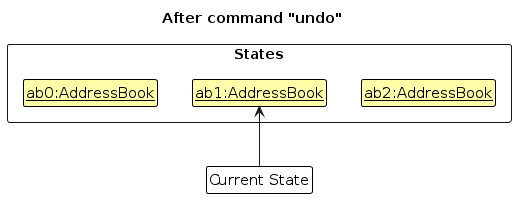
Given below is an example usage scenario and how the undo/redo mechanism behaves at each step.
Step 1. The user launches the application for the first time. The VersionedAddressBook will be initialized with the initial address book state, and the currentStatePointer pointing to that single address book state.
Step 2. The user executes delete 5 command to delete the 5th employee in the address book. The delete command calls Model#commitAddressBook(), causing the modified state of the address book after the delete 5 command executes to be saved in the addressBookStateList, and the currentStatePointer is shifted to the newly inserted address book state.
Step 3. The user executes add n/David … to add a new employee. The add command also calls Model#commitAddressBook(), causing another modified address book state to be saved into the addressBookStateList.
Note: If a command fails its execution, it will not call Model#commitAddressBook(), so the address book state will not be saved into the addressBookStateList.
Step 4. The user now decides that adding the employee was a mistake, and decides to undo that action by executing the undo command. The undo command will call Model#undoAddressBook(), which will shift the currentStatePointer once to the left, pointing it to the previous address book state, and restores the address book to that state.
Note: If the currentStatePointer is at index 0, pointing to the initial AddressBook state, then there are no previous AddressBook states to restore. The undo command uses Model#canUndoAddressBook() to check if this is the case. If so, it will return an error to the user rather
than attempting to perform the undo.
The following sequence diagram shows how an undo operation goes through the Logic component:
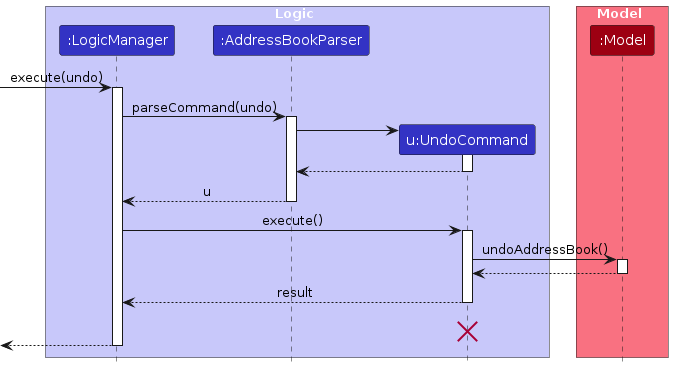
Note: The lifeline for UndoCommand should end at the destroy marker (X) but due to a limitation of PlantUML, the lifeline reaches the end of diagram.
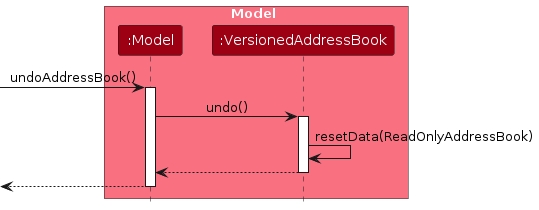
Similarly, how an undo operation goes through the Model component is shown below:
The redo command does the opposite — it calls Model#redoAddressBook(), which shifts the currentStatePointer once to the right, pointing to the previously undone state, and restores the address book to that state.
Note: If the currentStatePointer is at index addressBookStateList.size() - 1, pointing to the latest address book state, then there are no undone AddressBook states to restore. The redo command uses Model#canRedoAddressBook() to check if this is the case. If so, it will return an error to the user rather than attempting to perform the redo.
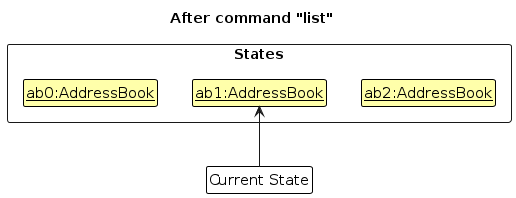
Step 5. The user then decides to execute the command list. Commands that do not modify the address book, such as list, will usually not call Model#commitAddressBook(), Model#undoAddressBook() or Model#redoAddressBook(). Thus, the addressBookStateList remains unchanged.
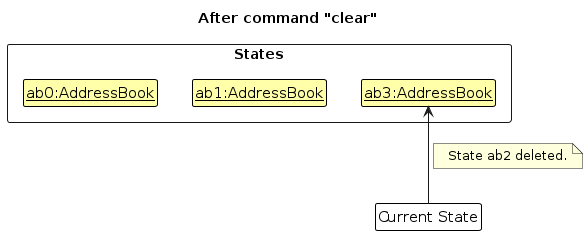
Step 6. The user executes clear, which calls Model#commitAddressBook(). Since the currentStatePointer is not pointing at the end of the addressBookStateList, all address book states after the currentStatePointer will be purged. Reason: It no longer makes sense to redo the add n/David … command. This is the behavior that most modern desktop applications follow.
The following activity diagram summarizes what happens when a user executes a new command:

Design considerations:
Aspect: How undo & redo executes:
Alternative 1 (current choice): Saves the entire address book.
- Pros: Easy to implement.
- Cons: May have performance issues in terms of memory usage.
Alternative 2: Individual command knows how to undo/redo by itself.
- Pros: Will use less memory (e.g. for
delete, just save the employee being deleted). - Cons: We must ensure that the implementation of each individual command are correct.
- Pros: Will use less memory (e.g. for
{more aspects and alternatives to be added}
Documentation, logging, testing, configuration, dev-ops
Appendix: Planned Enhancements
Team Size: 4
Automatically Refresh UI on Task List Updates: Currently, the UI does not refresh automatically when a user performs any task-related actions (e.g., adding or deleting a task) for an employee, requiring manual refreshing to see updates. We plan to modify the system to automatically refresh the UI once any task list-related action is completed, improving real-time data accuracy and user experience.
Rewrite UIDs to Resolve Duplicates: The system currently faces issues with duplicate UIDs (resorting to only showing the template data if the actual data has duplicate UIDs), which can lead to data integrity problems. We intend to implement a UID rewriting mechanism that activates upon detecting duplicate UIDs during data operations. This enhancement will ensure each entry has a unique identifier, thereby preventing data conflicts and potential errors during data processing.
Replace/Rewrite UIDs which overflow: The system currently faces issues with UIDs overflowing (after Java's Integer Max Value), which can lead to data integrity problems. We intend to implement a UID rewriting mechanism that activates upon detecting overflowed UIDs during data operations. This enhancement will ensure each entry has a unique identifier, thereby preventing data conflicts and potential errors during data processing.
Detailed Notifications for Corrupted Data: When encountering corrupted data, the system currently loads either blank or template data, without informing the user regarding the nature of the corruption. We plan to enhance this by providing detailed notifications that describe the exact issues with the corrupted data. For example, if a data corruption issue occurs due to format errors in a file, the system will specify which part of the data is incorrect and suggest possible actions to rectify the error.
Color-Coded Tags for Better Visibility: Currently, all tags in the UI are displayed in the same color, which can make it difficult for users to quickly distinguish between different categories or priorities. We plan to enhance the UI by introducing color-coded tags, allowing users to assign specific colors to different tags. This will improve user interaction by making it easier to manage and recognize tags visually.
Enhanced Task List Display on Employee Cards: The task lists on employee cards are currently presented as plain text, which does not provide an optimal user experience. We intend to redesign the task list display to be more visually appealing and interactive, making improvements such as dividing tasks by completed and uncompleted, for better organization and readability.
Truncate Employee Information to prevent UI overflow: Currently, the UI displays all employee information in full, which can lead to overflow if there is too long of a name, too many tags, or anything of this nature. We plan to implement a truncation mechanism that limits the display of employee information to a certain number of characters, ensuring that the UI remains clean and organized. Users can then expand the information to view the full details as needed. Also in this scenario, the UID will be moved to the top of the Employee card for easier visibility.
Allow non-alphanumeric characters in task descriptions: Currently, task descriptions are limited to alphanumeric characters, which can be restrictive for users who need to include special characters or symbols in their task descriptions. We plan to enhance the system to allow non-alphanumeric characters in task descriptions, providing users with greater flexibility and customization options when creating and managing tasks.
Feedback
Feedback is a crucial component of continuous improvement for ContactSwift. We actively encourage users, developers, and stakeholders to provide feedback to help us enhance both the functionality of ContactSwift and the usefulness of this Developer Guide.
Here are the ways you can contribute feedback and suggestions:
How to Provide Feedback
Issue Tracker
For technical issues, bugs, or feature requests, please use our official Issue Tracker. This allows us to categorize and prioritize issues effectively. When submitting an issue, please include as much detail as possible, such as the steps to reproduce the issue, expected versus actual behavior, and environment details (OS, ContactSwift version, etc.).
If you have suggestions for improving the Developer Guide or need to discuss matters that require discretion, we'll be providing our email soon here. We appreciate detailed feedback that includes specific sections or topics and any recommendations for improvement.
Surveys and Feedback Forms
Periodically, we may circulate surveys or feedback forms to gather comprehensive opinions on specific aspects of ContactSwift or the Developer Guide. These are excellent opportunities to influence the future direction of the software and documentation.
Feedback Etiquette
Constructiveness: We highly value constructive feedback that provides actionable insights and suggestions for improvement.
Respect and Courtesy: Engage respectfully and professionally with community members and maintain a supportive environment.
Confidentiality: Avoid sharing sensitive or confidential information in public forums or issue trackers.
What Happens to Your Feedback
Review Process: All feedback is reviewed by the development team. We prioritize actions based on the impact, feasibility, and alignment with our development roadmap.
Implementation: If your feedback leads to a change or improvement, we will acknowledge contributions in upcoming release notes or directly within the revised sections of the guide.
Response: While we aim to respond to all feedback, the volume of input may affect our ability to reply individually. However, we value every piece of feedback and strive to incorporate it as best as we can.
Your insights and contributions are invaluable to us and help ensure that ContactSwift continues to evolve in ways that meet and exceed user needs and expectations. Thank you for helping us improve and for being an active member of our community.
Appendix: Requirements
Product scope
Target user profile:
- needs to manage contacts of a growing population of employees
- prefers to use CLI over GUI
- can type fast
- values efficiency, transparency, and effective communication
- wants an app that works with different OS
Value proposition: manage contacts in an efficient manner using CLI app
User stories
Priorities: High (must have) - * * *, Medium (nice to have) - * *, Low (unlikely to have) - *
| Priority | As a … | I want to … | So that I can… |
|---|---|---|---|
* * * | small business owner | add employees to my contacts list | have quick access to my employees' contact details. |
* * * | small business owner | view employee contacts | easily manage and reach out to employees. |
* * * | small business owner | delete employee contacts | keep the contact list updated and free of redundancies. |
* * | small business owner | edit details of employees | ensure all contact information is current and correct. |
* * | team leader | assign tasks to employees | manage the workload and responsibilities within my team. |
* * | team leader | mark tasks as complete for employees | track progress and ensure timely completion of tasks. |
* * | manager | filter employees by role, team, or tags | quickly find employees based on specific criteria. |
* * | manager | find employees by name | quickly get contact details for communication purposes. |
* * | manager | list all employees | have an overview of all employees in the organization. |
* * | new user | access a help guide | understand how to use the application efficiently. |
* * | IT support | clear all entries from the address book | perform system maintenance or prepare for new data entry. |
* | business analyst | export contact and task data | analyze workforce distribution and task completion rates. |
Use Cases
Use Case: Add Employee
System: ContactSwift v1.4
Actor: User
Preconditions: User is viewing the employee list.
User initiates the addition of a new employee:
- Command:
add n/Jane Smith p/98765432 e/jane@example.com a/123 Clementi Rd r/Manager T/HR
- Command:
ContactSwift processes the command:
- Validates the command format and required details.
- Generates a unique ID (UID) for the new employee to ensure each entry is uniquely identifiable, even if other details are identical.
ContactSwift updates the employee directory:
- Adds the employee details to the in-memory database with the new UID.
- Sends a success message to the user including the UID of the newly added employee.
User verifies the addition:
- Command:
list - ContactSwift displays the updated list with Jane Smith's details, showcasing the new UID.
- Command:
Extensions:
- 2a. If the command format is invalid:
- ContactSwift sends an error message to the user, requesting correction of the input format.
Use Case: Delete Employee by UID
System: ContactSwift v1.4
Actor: User
Preconditions: User has the list of employees displayed.
User identifies the employee to delete using UID:
- Command:
delete uid/100
- Command:
ContactSwift processes the deletion:
- Validates the UID exists.
- Deletes the employee from the in-memory database.
ContactSwift updates the employee directory:
- Removes the employee from the list.
- Sends a confirmation message to the user.
User verifies the deletion:
- Command:
list - ContactSwift displays the updated list without the deleted employee.
- Command:
Extensions:
- 2a. If the UID does not exist:
- ContactSwift sends an error message to the user.
Use Case: Edit Employee Details
System: ContactSwift v1.4
Actor: User
Preconditions: User has the list of employees displayed.
User selects an employee to edit:
- Command:
edit 2 n/John Doe p/98765432
- Command:
ContactSwift processes the edit command:
- Validates the command format and index.
- Updates the employee's details in the in-memory database.
ContactSwift reflects the changes:
- Updates the employee's details in the display.
- Sends a success message to the user.
User verifies the update:
- Command:
list - ContactSwift displays the updated list with John Doe's new details.
- Command:
Extensions:
- 2a. If the specified index is invalid:
- ContactSwift sends an error message to the user.
Use Case: Assign Task to Employee
System: ContactSwift v1.4
Actor: User
Preconditions: User has the list of employees displayed.
User assigns a task to an employee:
- Command:
addTask uid/100 Complete the report by 5pm
- Command:
ContactSwift processes the task addition:
- Validates the command format and UID.
- Adds the task to the employee's task list.
ContactSwift confirms the addition:
- Sends a success message to the user.
User verifies the task addition:
- Command:
list - ContactSwift displays the updated task list for the employee.
- Command:
Extensions:
- 2a. If the UID does not exist:
- ContactSwift sends an error message to the user.
Use Case: Filter Employees
System: ContactSwift v1.4
Actor: User
Preconditions: User is viewing the employee list.
User inputs filter criteria:
- Command:
filter n/Jane Doe t/friend
- Command:
ContactSwift processes the filter:
- Validates the criteria.
- Applies the filter to the employee list based on the specified attributes.
ContactSwift displays filtered results:
- Shows only employees who meet the criteria.
- Sends a message that shows what the list was filtered by.
Extensions:
- 2a. If no criteria are provided:
- ContactSwift sends an error message about missing filter parameters.
- 2b. If no employees match the criteria:
- ContactSwift displays an empty list.
- Sends a message saying no employees found.
Non-Functional Requirements
Cross-Platform Compatibility: The application must be executable on any mainstream operating system, including Windows, macOS, and Linux, with Java Runtime Environment (JRE) version 11 or above installed, ensuring accessibility for a diverse user base across different operating systems.
Performance Efficiency: The application should handle up to 1,000 employee records while maintaining response times under 2 seconds for all functionalities under typical usage conditions.
User Efficiency and Command-Line Proficiency: Designed for users with above-average typing speeds, the application should facilitate task completion via CLI commands significantly faster than equivalent tasks performed using a GUI. Specifically, users should be able to accomplish at least 80% of the tasks 30% faster using commands than using the mouse, ensuring the software optimizes productivity for those proficient in typing regular English text. This efficiency gain should be validated through user testing and time-motion studies to ensure the interface meets the high-speed requirements of proficient typists.
User Interface Design: The software must provide an intuitive, user-friendly interface, balancing efficiency for CLI users with accessibility for those preferring or requiring GUI interaction. This includes clear visual cues, streamlined navigation, and a minimalistic design to minimize cognitive load.
Data Security: The application must employ robust encryption and access control mechanisms to ensure that private contact details are secure and inaccessible to unauthorized users, complying with industry-standard security protocols.
Data Integrity: The software should incorporate data validation, regular backups, and error-checking mechanisms to prevent loss or corruption of contact information, ensuring high data integrity and reliability.
Portability: The application, packaged as a .jar file, must include all necessary dependencies or facilitate easy resolution of such dependencies, ensuring smooth operation across different systems without complex setup procedures.
Operational Speed: Every operation within the application should complete within 0.5 seconds for a dataset containing up to 1,000 employees, ensuring a seamless user experience.
Memory Usage: The application should operate efficiently within 500 MB of memory and should not exceed 0.5 GB of memory usage, even with an address book size of up to 50,000 employees, optimizing resource utilization.
Appendix: Effort
This appendix provides an overview of the efforts involved in the development of our enhanced contact and task management application, which evolved from the original AB3 code base. This section details the difficulty level, challenges faced, effort required, and the achievements of the project.
Difficulty Level
The project began with the AB3 code base, a basic contact management system. Transitioning this into a more comprehensive tool that includes both contact and task management introduced significant complexity. The addition of task management required substantial modifications to the system's architecture and data handling capabilities.
Challenges Faced
- Integration of New Features: Merging task management capabilities with the existing contact features was a primary challenge. This included integrating unique identifiers for each employee, and enabling functionalities like delete by name, delete by UID, filter, add tasks, delete tasks, mark and unmark tasks.
- User Interface Enhancement: While the primary focus was not on enhancing the interface for additional functionalities, a significant effort was made to improve the overall aesthetic and user interaction quality of the interface. This involved redesigning elements to make the interface more visually appealing and engaging for users.
Effort Required
The project demanded extensive commitment from our development team over several weeks:
- Research and Planning: Initial phases involved in-depth analysis of the AB3 code base to identify the best approaches for integrating new functionalities without disrupting the core features.
- Development and Implementation: Significant time was spent developing the new features, ensuring they were seamlessly integrated with the existing system components.
- Testing and Refinement: Following development, rigorous testing was conducted to ensure the new features functioned as intended and met user requirements.
Achievements
- Enhanced Functionality: The project successfully transformed a simple contact management tool into a robust application capable of managing both contacts and tasks effectively. The addition of task management features notably expanded the application’s utility.
- Improved User Interface: The user interface was overhauled not just for functionality but to enhance visual appeal, making the application more user-friendly and attractive.
- Added Features: Successfully implemented several new features, including:
- Unique Identifier for Each Employee: Facilitated precise operations like delete and task assignments.
- Delete by Name and UID: Provided flexible options for user interactions.
- Task Management: Added comprehensive task management capabilities including adding, deleting, marking, and unmarking tasks.
- Filtering Capability: Enhanced the ability to sift through large sets of employee data based on various criteria.
In conclusion, the development of this enhanced contact and task management application was a substantial effort that required overcoming significant challenges and demanded a high level of dedication and expertise from the entire team. The project’s success in integrating robust task management features into the existing contact management framework marks a significant enhancement over the original AB3 code base, tailored specifically to meet the evolving needs of our users.
Appendix: Instructions for manual testing
This section provides instructions on how to manually test the functionalities of the ContactSwift application. Manual testing involves simulating user actions to verify that each feature behaves as expected. It is essential to perform thorough manual testing to ensure the application is reliable and functions correctly under different scenarios.
Note: These instructions only provide a starting point for testers to work on; testers are expected to do more exploratory testing.
Launch and Shutdown
Initial Launch
Action: Download the jar file and copy it into an empty folder. Double-click the jar file to open. Expected: The application launches displaying the GUI with a set of sample contacts. The window should be appropriately sized.
Saving Window Preferences
Action: Resize the window and move it to a different location. Close the window and reopen the application. Expected Outcome: The application remembers the last window size and position.
Adding an Employee
Valid Add Command
Action: Enter the command add n/John Doe p/12345678 e/john@example.com a/123 Main St r/Manager T/HR.
Expected Outcome: John Doe is added to the list of employees. A success message including John Doe's details is shown.
Invalid Add Command
Action: Enter the command add n/John Doe.
Expected Outcome: No new employee is added. An error message is displayed indicating that essential fields are missing.
Editing an Employee
Valid Edit Command
Action: Assuming John Doe is listed as the first contact, enter edit 1 p/87654321 e/newjohn@example.com.
Expected Outcome: John Doe's phone and email are updated. A success message showing the updated details is displayed.
Invalid Edit Command
Action: Enter edit 99 n/Jane Doe.
Expected Outcome: No contact is edited because the specified index is out of bounds. An error message is displayed.
Deleting an Employee
Valid Delete Command
Action: Assuming John Doe is listed as the first contact, enter delete 1.
Expected Outcome: John Doe is deleted from the list. A success message is displayed.
Invalid Delete Command
Action: Enter delete 999.
Expected Outcome: No contact is deleted because the specified index is out of bounds. An error message is displayed.
Using the Filter Command
Valid Filter Command
Action: Enter filter t/HR.
Expected Outcome: The list is filtered to only show employees tagged with "HR". A success message tells the user what the list has been filtered by. The contacts that fulfill the predicate are displayed.
Invalid Filter Command
Action: Enter filter x/abc.
Expected Outcome: No change in the displayed list. An error message is shown indicating that there are no valid fields present for the filter command.
Assigning Tasks to Employees
Valid Task Assignment
Action: Assuming John Doe has a UID of 101, enter addtask uid/101 Complete the report by Friday.
Expected Outcome: The task is added to John Doe's task list. A success message is displayed.
Invalid Task Assignment
Action: Enter addtask uid/999 Do something.
Expected Outcome: The task is not added as the UID does not exist. An error message is displayed.
Marking and Unmarking Tasks
Valid Mark Task
Action: Assuming the task is the first in John Doe’s task list, enter mark uid/101 1.
Expected Outcome: The task is marked as done. A success message is displayed.
Invalid Mark Task
Action: Enter mark uid/101 99.
Expected Outcome: The task is not marked as there is no task at index 99. An error message is displayed.
Data Persistence
Data Saving and Loading
Action: Add several employees, close the application, and reopen it.
Expected Outcome: The added employees should appear in the list as they were before closing the application.
Handling Corrupted Data
Action: Manually corrupt the data file by adding invalid characters or corrupting the format, then open the application.
Expected Outcome: The application should not crash. An error message should be displayed, and the application might revert to using default sample data or blank data.
These test cases are intended to cover the primary functionalities of the ContactSwift application. Testers are encouraged to perform additional exploratory testing to uncover less obvious bugs and ensure the application handles various edge cases gracefully.
Glossary
Command Format: Describes the syntax used to input commands in ContactSwift. Examples include adding or deleting contacts. Commands must adhere to this format for successful execution.
Contact Deletion: Allows users to remove contacts from their address book, requiring a valid contact ID for the operation.
Contact ID: A unique identifier assigned to each contact, used in commands such as deleting a contact to specify the target.
Contact Information Storage: Manages how contact details are stored within the application, which could be in-memory, in a database, text file, or CSV file, depending on configuration.
Expected Outputs: Confirmation messages or outcomes expected after executing commands, such as successfully adding or deleting contacts.
Failure Outputs: Error messages that are generated in response to issues like missing details or incorrect command formats, aiding in troubleshooting.
Good to Have Features: Additional functionalities that enhance user experience, including tags for contacts, search filters, and a favorites feature for quick access.
Mainstream Operating Systems (OS): Refers to commonly used operating systems like Windows, macOS, and Linux. ContactSwift is designed to be compatible across these platforms, ensuring a wide user base.
Must-have Features: Core functionalities essential to the application, such as contact addition, contact deletion, contact information storage, and all contacts list display.
Performance Efficiency: The application should handle large volumes of data (e.g., up to 1,000 employee records) with response times under specific thresholds (e.g., 2 seconds) to ensure usability.
System Requirements: Specifies the technical requirements needed to run ContactSwift, including the required version of the Java Runtime Environment (JRE) and compatibility with mainstream operating systems.
Security Measures: Details the security protocols and encryption standards employed by ContactSwift to protect user data, ensuring compliance with industry security standards.
User Interface (UI) Design: The design principles guiding the application's user interface, aiming for intuitive use, minimalistic design, and a balance between CLI and GUI functionalities.
User Roles and Permissions: Describes the different levels of access and capabilities granted to users within ContactSwift, dictating what actions each user type can perform within the application.